
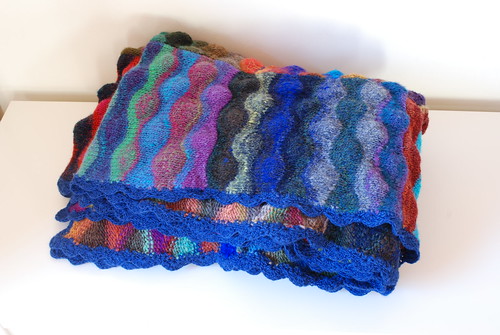
Properly, properly finished, with crochet edging and everything!
Do you want to see how it looks unfolded? I feel there should be a red ribbon to cut, or a curtain to pull aside. In lieu of either, please imagine appropriate levels of brass bands, milky cups of tea and something involving strawberry jam being squashed underfoot. If you could stretch to a lop-sided marquee that would be great.
Without further ado, may I share with you:
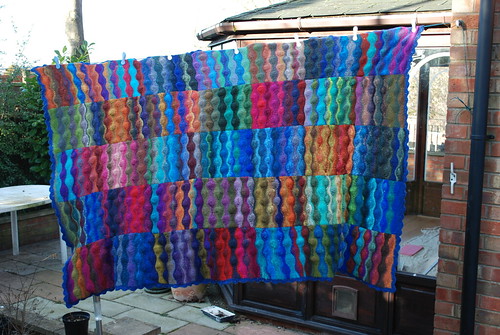
My Lizard Ridge. Or as H refers to it "My Blankie".
(I've just looked out the window as I write this and someone in the next village along has just let off a stream of fireworks. Thank you. I'm glad you like the blanket)
Although I knit every stitch and crocheted every crochet, there has been an element of collaboration in this project because it was H who sorted out the order of the squares for me. When I finished the last square over a week ago and laid it all out on our lounge floor I crept into bed and whispered pitifully "I've finished. But I'm not sure I'm going to like it". The boy replied "just wait until I've finished with it" and told me to go to sleep.
The next evening he started re-laying the squares, bringing his art eye to the equation. He started by trying to organise the squares into swathes of colour so that they ran from orange in one corner to blue in the other with green in the middle and everything else all around. Once he had done that he started mixing them up a bit, with both of us swapping around pairs of squares.
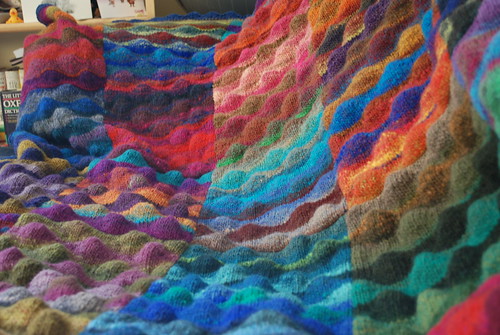
The blanket sat on our floor in squares for three days before we decided that we had the final set up. One trick that we used quite a bit was to take pictures of the blanket on a black and white setting to check the balance of the blanket. I can't remember where I heard that suggestion but it really works.

This is the final blanket arrangement and you can see that there isn't really any one area that is disproportionately dark or light.
To keep the order I pinned it all together with quilt pins and sewed each seam 'in situ', removing the pins as I came to them. I seamed the squares into bigger squares and then joined them all together with three long horizontal seams. Contrary to my expectations, I found it easier to sew the horizontal seams because there was less pressure to make sure that the stripes were matching up. In every vertical seam, one of the edges will be the edge that you carried the colour up and it is incredibly easy to count the carried yarn as part of the two 'bars' for mattress stitch, you just have to keep an eye on it.
I also discovered that on at least two squares I'd missed out a bit of short rowing so I had to ease them in. It isn't noticeable in the finished blanket and even I would have to look pretty carefully to remember which squares they are.
I found the best thing to sew up with is leftover sock yarn, it's very smooth and strong so it slides through the Noro easily and you can give it a good yank to pull the two edges together.

The crochet edging took me from Tuesday evening to last night. For a non-crocheter it was a surprisingly easy edging. The first row is just a set up row and the second was easy enough once I got into the flow of it. I should stress that this is what I think the crochet instructions say to do, and it is an edging that looks quite like the one in the picture; but I am by no means a proficient crocheter so I make no promises that I have read the pattern correctly. It looks good, and that's all that really matters.
For the edging I used Noro Cash Iroha in a deep blue, colour 7 (the same as I used for a Christmas Hat) . It's one of Noro's few solid colours but it picks up on so many of the colours in the blanket and gives a lovely unified feeling to the whole. It also has 20 % cashmere which makes the edges extra soft and snuggly under the chin.
I used two balls for the entire edging, and had 22g left of the second ball.

Ever since I started sewing it up I've wondered whether, and to what extent I should block; thoughts not unrelated to the size of the blanket, the length of time it would take to dry, and our available space and towels. A number of people have said how much the egg-carton texture adds to the blanket and I've seen that a number of finished blankets on Ravelry have been left 'au natural'.
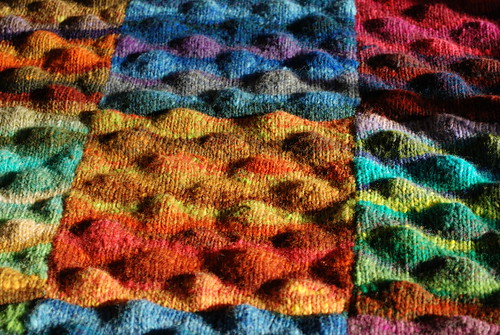
Final decision made by H: egg cartons all the way. The only blocking I have done is to steam the edges to stop them curling and to finish the crochet to it's best advantage. I simply pressed the edges under a damp tea towel with the iron on the wool setting. Because that also blocked part of each of the outer squares, the blanket has a slightly flared look at the moment as the blocked blanket is going to be bigger than the unblocked for obvious reasons. It isn't a pronounced flare and when it's tucked up around you on the sofa, who's going to notice. If I decide that I would like it to be fully blocked then I can wait for a hot sunny day (fingers crossed) and block it on the lawn.
The blanket is plenty big enough as it is - I'm 6' tall and I can sit on the sofa with my toes tucked up and the top edge snuggled up under my chin. For a sense of scale, this:
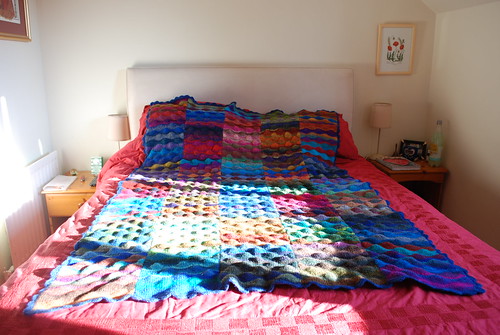
Is a king size bed. And this:
Is a sofa smothered in blanket. Which is where I am headed right now. Possibly to look at blanket books - you just can't have too much of a good thing you know!
In conclusion, my top tip for Lizard Ridge blankets:
Go and knit one NOW!!
beautiful!
ReplyDeleteI cannot even tell you how beautiful your blanket is. You did a smashing job and so did H. I'm with him...leave the egg cartons intact.
ReplyDeleteWow.
This comment has been removed by the author.
ReplyDeleteWoW, I love it.
ReplyDeleteIt is lovely but I still think I'll pass. The making up would finish me off.
ReplyDeleteThe grey scale thing works well for quilts too, you can buy a sheet of red plastic to look through that takes away the colour and just lets you see the tone.
Absolutely stunning. I've added this to my 'to do list'.
ReplyDeleteThe prettiest Lizard Ridge EVER!
ReplyDeleteI can't believe I was gone for the unveiling!!! But I loved coming back and seeing that you got it done. That is a seriously cool blanket---lovely colors and you did a great job on it. And very cool that your husband helped to organize the squares...nice teamwork!
ReplyDeleteps...thanks for sharing the tip of photographing it in black and white--I never would have thought of that but it makes so much sense!
Greetings from Washington, DC. The photo tip was helpful. Your blanket design, sense of color, and technique are fabulous. I've been knitting for almost twenty years and love every project I create, but I will never have your gift. Best regards.
ReplyDelete